Holes are critical features in engineering drawing & manufacturing. They facilitate assembly fastening, channel, or passage for fluid flow, positioning, weight reduction, etc. There are several types of holes in engineering to serve these purposes. They are typically distinct from each other in shape, depth, functionality, and required tooling to create them.
Through, blind, tapped, countersink, interrupted, tapered, counterbore, and reamed types are frequently used in various mechanical components and systems. Understanding these holes, their design, characteristics, and functionality is essential before including them in your part’s design.
Continue reading, this article will guide you through 14 different types of holes.
What is a Hole Feature in Engineering?

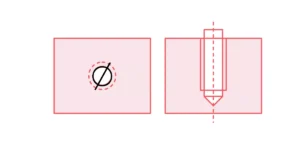
A hole in engineering is defined as a circular cavity or opening geometry, which can be through or blind from the surface. In technical drawings, you can recognize them with specific symbols and corresponding GD & T’s. For instance, the ‘Ø ‘ symbol with the corresponding diameter is used to denote simple engineering holes.
Meanwhile, CNC drilling, punching, tapping, broaching, and EDM drilling are common techniques. Which technique to use depends on the characteristics specified in the design.
Location, diameter, depth, and tolerances are the defining variables for any hole type. Datum and references (lines, planes, axes, etc.) are used for accurate positioning or location. The depth and diameter are essential for choosing the right tool size and machining parameters, whereas tolerances manintains the hole accuracy and precision.
An Overview of 14 Types of Engineering Holes
| Hole Type | Cross-Section/Shape | Purpose |
| Simple Hole | Circular, uniform diameter | Assembly and clearances. |
| Through Hole | Circular, extends fully through | Fluid passage, wiring, and fastening. |
| Blind Hole | Circular, single opening | Mounting, screwing, and weight reduction. |
| Interrupted Hole | Circular, discontinuous | Bearing seats, locating pins, and bolts. |
| Threaded Hole | Circular with internal threads | Fastening with internal helical threads. |
| Tapered Hole | Conical, reducing diameter | Press joints, fluid control, and high-performance seals. |
| Counterbore Hole | Cylindrical recess | Fastener head housing and aesthetics. |
| Countersink Hole | Conical recess | Better fastening and sealing. |
| Counterdrill Hole | Conical/tapered enlargement | Smooth finishes and better screwing |
| Spotface Hole | Shallow counterbore | Pressure distribution and smooth rest for fastener heads. |
| Screw Clearance | Circular, slightly oversized | Easy screw passage, disassembly, and reassembly. |
| Reamed Hole | Refined circular opening | High accuracy and improved surface finish. |
| Overlapping Hole | Partially/fully intersecting circles | Useful in complex assemblies |
Simple Hole

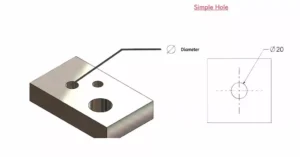
It is a straight circular hole on the surface, which can be through or blind. A circular opening extends to a certain depth or all through the thickness with a uniform diameter. Simple holes are used for the assembly or clearances. They are denoted by “Ø “ in the drawing, and you can drill with common drillbits of the desired diameter.
Through Hole

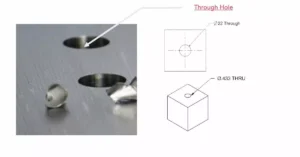
Always the opening is not on both sides (or through all thicknesses), some are drilled to a certain thickness, called through holes. They involve the format of “Ø diameter Thru” in drawing representation. For example, “ Ø 30 Thru” represents a thorough hole of 30 mm diameter.
Moreover, they are critical for fluid passage, wiring space, and fastening purposes. You can create these kinds of holes by drilling or punching the workpiece.


